
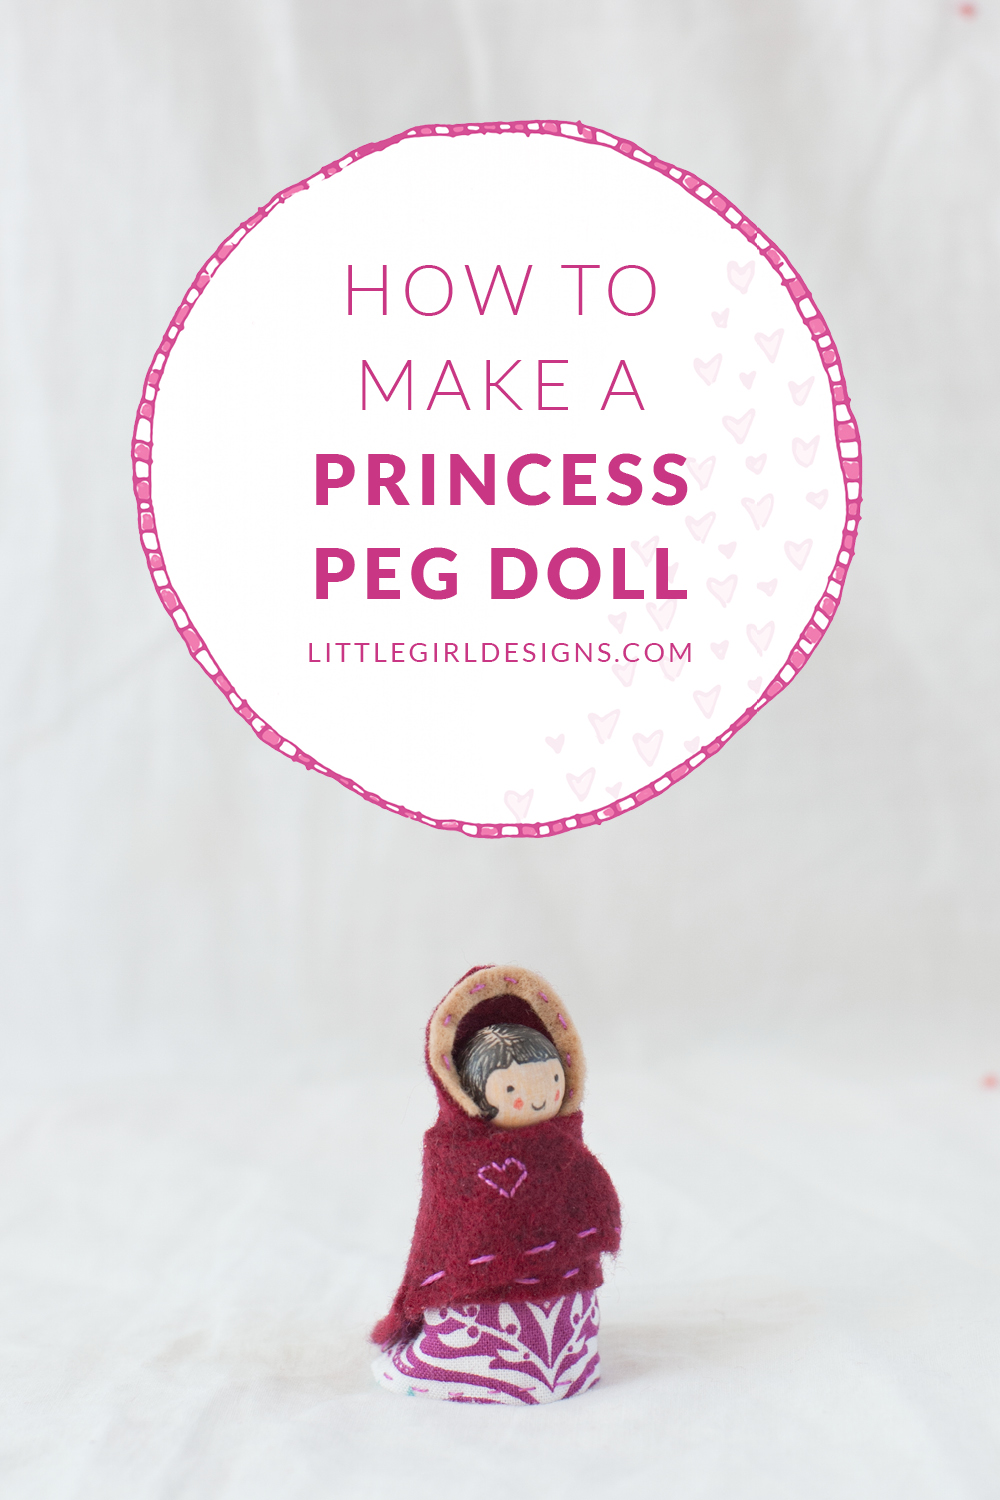
Have you ever made a princess peg doll? What I love about this craft is not only does it help use up bits and pieces of your craft and fabric stash, the designs are limitless due to whatever fabric you have on hand.
Several years ago I bought a package of peg dolls thinking I was going to make a bunch of them for Christmas ornaments. I think I got as far as opening the package and trying to paint one before they were tucked away into a craft drawer. It’s not that they are particularly difficult to paint, I just didn’t realize a basic ‘rule’ in doing so (which I will be sure to share with you!)
This princess peg doll can easily be transformed into an ornament by adding a bit of embroidery floss to her hood, but for today she’s going to be a regular princess.
How to Make a Princess Peg Doll
You will need:
Plain wooden peg doll (available online or at craft stores)
Hot glue gun
Scissors
Fabric scraps
Felt scraps
Embroidery floss in matching colors
Needle
Pencil
Pen to draw features and hair (preferably waterproof)
Colored pencils
(in lieu of the pen and colored pencils, you could also use acrylic paints to paint hair and features)
First, I assembled my scraps and decided what I wanted to make. I decided to make a cape with a hood that would go over the princess’ dress. To be honest, you do not have to be as detailed as I have been. You could make your princess doll by simply gluing on fabric without any embroidery whatsoever. I just thought it would be extra fun to add some embellishment for this doll.

First, the cape. I took a piece of felt and wrapped it carefully around the doll to see how it would fit her and then cut. Originally, she was just going to have a wrap but then I saw a small, somewhat circular felt scrap lying there and decided to add a hood. I carefully stitched the hood onto the main cape piece so that the thread didn’t show on the other side. You could also use hot glue to tack the hood in place.
To add some color, I took two strands of embroidery floss and stitched along the edge of the cape. I also stitched a heart that would show in the front when her cape was closed. For the ‘cape lining’, I cut a tiny piece of tan felt and stitched it straight onto the hood. I love that you can add such detail with just a few stitches!

For the princess’ face and hair, I decided to use my micron pen so I would have a littler more control of the process. First, I lightly outlined her features with a pencil. This is where I went wrong in the past. It seemed too simple to draw an outline with pencil so I just painted on the features freestyle. This could work for you but for me it ended up being a mess. If you mark lightly enough, you won’t even have to erase your marks because you’ll be drawing/painting right over them.
For her hair, I drew the outline with my pen, then filled it in with lines. Then I took a black colored pencil and lightly filled in the hair a bit more. I like this textured look. Her cheeks are colored pencil and I also used a cream colored pencil for her facial skin (her body will be covered with clothes, so no need to paint or decorate it.)

For her dress, I took a small rectangular piece of fabric and measured it against the princess. You’ll notice in the pictures below that this means the dress will not perfectly cover her back. But I knew I was making a cape so this didn’t matter.
I ironed the edges and then decided to stitch them so they would lay completely flat. You could use stitch witchery here; I couldn’t find mine until after I finished this project. 😉

Here she is, all ready to get dressed!

Get your hot glue gun out and dot a little bit of glue on the doll’s neck in order to anchor the dress. If you’ve ever worked with hot glue before, you’ll know you have to work fast because the glue dries in an instant! Once the dress is anchored, glue the back closed.
So cute!

Here’s a side view of the princess—you can see how her dress doesn’t quite match up in the back but as I said, this will be covered by the cape, and I think it looks cute.

And now for the cape! I used the hot glue gun to tack the cape onto the back of her neck and then wrapped it around her, gluing a bit here and there as I went. For next time, I think I might leave the front of the cape open and fasten it with a little magnet or something easy to open and close so the top of her dress is still visible. You might have just the thing in your stash that would work for that.

Here she is walking away in the snow. I’m so glad I added the embroidery stitches to the cape. When you’re making things that are this small, it is a good idea to add small embellishments here and there. They make a big difference. You could easily add a tiny button or glue on little flat beads.

And here she is, with the hood of her cape down. What a sweet little doll! Aren’t things cuter when they are tiny? I think so. Well, I hope you enjoyed this princess peg doll tutorial. I think I’m going to make more of these. It is such an easy and fast craft!

For more fun and easy crafts, be sure to check out my Crafts projects page.
Have a lovely {and creative} day!


45 responses to “How to Make a Princess Peg Doll”
So cute! So very very cute. It’s a craft I’ll definitely try.
Thank you! They are so easy to make–I’m sure you’ll have fun. 🙂
This is so cute and a perfect gift too. I’m thinking you could make a whole family complete with a DIY dolls house!
That would be so cute! 🙂
Very cute! So many possibilities with this idea. I like crafts that help use up all the little pieces of fabric I can’t bear to throw away!
Me too! Sometimes those little scraps have a lot of sweet memories attached to them. 🙂 Thanks for stopping by! 🙂
This is so sweet! I made peg people as stocking stuffers for my girls this past Christmas, but nothing as adorable as this one! Definitely pinning this. =)
Thanks so much, Mary-Ann! I love how easy (and fun) these are to make! 🙂
Adorable and creative ~ So well done!
Happy Weekend to you,
artmusedog and carol
Thanks so much! 🙂 🙂
These would be perfect for the Victorian doll house I’m restoring!! Hope you hop over and share at my Link Party too!!
Oh, what a great idea! I’ll come and visit! 🙂
This is so cute!
Thanks, Kim! 🙂
These are so adorable. Thank you for sharing at the Project Parade Link Party. Have a great weekend.
Thank you, Rosemary! 🙂 And thanks for stopping by! 🙂 🙂
Oh my goodness, she is so cute! You did a really great job. I pinned it so I can show this to my crafty 12 year old daughter 🙂
Thanks so much! Have a great day! 🙂
This is so adorable! I’ve made peg dolls before but they never looked as good as this, I love yours with the little details and the hood – how cute!
Thanks so much! I love that just a few stitches (literally!) adds such detail. 🙂 Thanks for stopping by. 🙂
Wow, this is really an adorable craft. I was just researching ways to create a fairy garden complete with fairies, princesses, and houses for my 2 year old last night. This is a great idea and I can’t want to try it (minus the sewing.. I can’t sew. lol)!
That sounds wonderful! If you can’t sew, the hot glue gun will be your friend! 🙂
This is gorgeous! Have pinned it too 🙂 x
Thanks so much, Kate! 🙂
so pretty! Love the detail on the cape. Thanks for sharing at our FB Share Day!
Thanks for allowing us to share with your readers! 🙂 🙂
So precious! Thank you for linking up at the Home Matters Linky Party this week!
You’re so welcome! Have a great day!
I asked my daughter if she thought that your doll was cute. She said “It is adorable!”. 🙂
Oh, thanks so much, Kristie! 🙂 Your daughter’s comment made my day! 🙂
These are precious! I will definitely be making these for my little girl 🙂
Oh, she will love them! 🙂
Very cute idea, Jennie! Thanks for linking up at Women With Intention Wednesdays! I look forward to seeing what you have for us this week!
Thanks for sharing on My 2 Favorite Things on Thursday!! Hope you come back tomorrow and share some more stuff!! Pinned!!
http://www.cookinandcraftin.com/my-2-favorite-things-on-thursday-link-party8/
Thanks, Elaine! You’re on my list to visit in the morning. 🙂
My daughter wants to make this now 😉 Good thing I have lots of scraps around from my own crafting!!
Wonderful! I love that by using different scraps, the dolls have different ‘personalities’…Have fun! 🙂
I love this little doll. You have such great patience to work with something so small. She is beautiful. Thanks for linking this to the This Is How We Roll Link Party!
Thank you so much, Cynthia! She is really small, but I liked that I only had to make probably 10 stitches to make her dress. 🙂 Too fun! Have a great day!
This is such a cute idea! My daughter would love to make one of these!
Thank you for stopping by the Thoughtful Spot Weekly Blog Hop this week. We hope to see you drop by our neck of the woods next week!
Thanks, Jill! 🙂
Supercute! This looks so amazing. Pinned and tweeted. We love to party with you, so I hope to see you tonight at 7 pm.. Have an amazing day! Lou Lou Girls
Thanks and thanks for stopping by! 🙂
Very cute. May I also suggest (since I saw the price for TWO peg dolls is $12.50!!!), that you try the little clothespins — the non-clip kind that you just slide onto the clothing — because you can get a big bag of those for only a few bucks! 😀 I’ve made dolls/chip bag holders out of those before. I used washi tape, though. I love YOURS with their cute little fabric clothing, too! Sooo Adorable!!! I was just thinking that if you’re going to cover up their little bodies, you might as well have the cheapie ones!!! Just an idea. 🙂
Great idea, Tina! I actually bought a pack of plain peg dolls on Etsy years ago. They were very inexpensive (which is why I bought them!) It was a while ago, though, and I can’t remember the seller’s name or I would have added it to this post! :/ I do love your idea, though because the doll would be portable–too cute! 🙂